| Table of Contents |
|---|
Introduction
...
- Enable JMX for the application which will be monitored
- Depending on JMX configuration of monitored server, adjust SPM monitor's JMX settings in monitor properties file (whose exact location and name for your application are mentioned in step 3 on http://apps.sematext.com/spm-reports/client.do)
...
| Code Block | ||
|---|---|---|
| ||
sudo service spm-monitor restart |
JMX Setups (i.e. How to Configure the Monitored App/Server)
There are 3 basic JMX setups (all explained below):
- No security setup
- Security with password file
- Security with SSL and keystore/trustore
No Security Setup
...
| Code Block | ||
|---|---|---|
| ||
-Dcom.sun.management.jmxremote
-Dcom.sun.management.jmxremote.port=3000
-Dcom.sun.management.jmxremote.ssl=false
-Dcom.sun.management.jmxremote.authenticate=false |
...
| Code Block | ||
|---|---|---|
| ||
SPM_MONITOR_JMX_PARAMS="-Dspm.remote.jmx.url=localhost:3000" # MUST match the port in -Dcom.sun.management.jmxremote.port=3000 above |
Security with Password File
...
| Code Block |
|---|
monitorRole somepassword123 |
Note: when choosing the role name, make sure it is defined in jmxremote.access file of your JRE (for example, in location like: /usr/lib/jvm/java-7-oracle/jre/lib/management/jmxremote.access). By default, role named monitorRole is defined and can be used out-of-the-box. If you want to use some other role name, you should first define it in jmxremote.access file.
...
| Code Block | ||
|---|---|---|
| ||
-Dcom.sun.management.jmxremote
-Dcom.sun.management.jmxremote.port=3000
-Dcom.sun.management.jmxremote.ssl=false
-Dcom.sun.management.jmxremote.authenticate=true
-Dcom.sun.management.jmxremote.password.file=/home/tomcat/passwordServer.txt |
...
| Code Block | ||
|---|---|---|
| ||
SPM_MONITOR_JMX_PARAMS="-Dspm.remote.jmx.url=localhost:3000 -Dspm.remote.jmx.password.file=/home/spm/passwordMonitor.txt" |
Security with SSL and Keystore/Trustore
...
| Code Block | ||
|---|---|---|
| ||
-Dcom.sun.management.jmxremote
-Dcom.sun.management.jmxremote.port=3000
-Dcom.sun.management.jmxremote.ssl=true
-Djavax.net.ssl.keyStorePassword=password123
-Djavax.net.ssl.keyStore=/home/tomcat/server.ks
-Dcom.sun.management.jmxremote.authenticate=false |
...
| Code Block | ||
|---|---|---|
| ||
SPM_MONITOR_JMX_PARAMS="-Dspm.remote.jmx.url=localhost:3000
-Djavax.net.ssl.trustStore=/home/spm/monitor.ts
-Djavax.net.ssl.trustStorePassword=password456
-Dcom.sun.management.jmxremote.ssl.need.client.auth=true" |
...
Specifics Related to Various Servers
...
Starting with Java Command
Here is example of starting Jetty server (any jar could have been used here; the Jetty started here could have run Solr or some other application):
| Code Block | ||
|---|---|---|
| ||
java -Dcom.sun.management.jmxremote
-Dcom.sun.management.jmxremote.port=3000
-Dcom.sun.management.jmxremote.ssl=true
-Djavax.net.ssl.keyStorePassword=password123
-Djavax.net.ssl.keyStore=/home/jetty/server.ks
-Dcom.sun.management.jmxremote.authenticate=false
-jar start.jar |
Jetty (to run Solr or other apps)
See Starting with Java Command.
Tomcat (to run Solr or other apps)
There are various ways of adjusting your Tomcat, depending on the version and on how it was installed (whether you just unpacked tomcat package or installed it with apt-get install). One way is editing /etc/default/tomcat6 (if it exists) by adding:
| Code Block | ||
|---|---|---|
| ||
CATALINA_OPTS="${CATALINA_OPTS} -Dcom.sun.management.jmxremote
-Dcom.sun.management.jmxremote.port=3000
-Dcom.sun.management.jmxremote.ssl=false
-Dcom.sun.management.jmxremote.authenticate=true
-Dcom.sun.management.jmxremote.password.file=/home/tomcat/passwordTomcat.txt" |
In some other cases, you may want to make similar addition for CATALINA_OPTS variable in your bin/catalina.sh file.
Elasticsearch
No need for any adjustments since SPM monitor uses JSON API calls to collect Elasticsearch metrics.
HBase
Adjust your hbase-env.sh file. For instance, hbase master could get the following parameters:
| Code Block | ||
|---|---|---|
| ||
export HBASE_JMX_BASE="-Dcom.sun.management.jmxremote.ssl=false -Dcom.sun.management.jmxremote.authenticate=false"
export HBASE_MASTER_OPTS="$HBASE_JMX_BASE -Dcom.sun.management.jmxremote.port=3000" |
...
| Code Block | ||
|---|---|---|
| ||
export HBASE_JMX_BASE="-Dcom.sun.management.jmxremote.ssl=false -Dcom.sun.management.jmxremote.authenticate=false"
export HBASE_REGIONSERVER_OPTS="$HBASE_JMX_BASE -Dcom.sun.management.jmxremote.port=3000" |
...
When installing spm client, both monitor properties files will be prepared for you (exact locations and names for your application are mentioned in step 3 on http://apps.sematext.com/spm-reports/client.do).
Sensei
Adjust your start-sensei-node.sh by changing JAVA_OPTS like this:
| Code Block | ||
|---|---|---|
| ||
JAVA_OPTS="$JAVA_OPTS -Dcom.sun.management.jmxremote
-Dcom.sun.management.jmxremote.port=3000
-Dcom.sun.management.jmxremote.ssl=true
-Djavax.net.ssl.keyStorePassword=password123
-Djavax.net.ssl.keyStore=/home/sensei/elasticsearch.ks
-Dcom.sun.management.jmxremote.authenticate=false" |
Hadoop
With Hadoop, each Hadoop node has a separate configuration of java arguments. If you are using hadoop-env.sh file (located in /etc/hadoop/conf or HADOOP_HOME/conf dir; NOTE: in case it doesn't exist, usually it is enough to create it in Hadoop's conf subdir, it will automatically be used by Hadoop; please also check with your Hadoop distribution docs what is the alternative), you can adjust them by adding some of (example for simple no-security jmx setup):
| Code Block | ||
|---|---|---|
| ||
# both MRv1 (0.22 and earlier, 1.0, 1.1) and YARN (0.23, 2.*)
export HADOOP_NAMENODE_OPTS="$HADOOP_NAMENODE_OPTS -Dcom.sun.management.jmxremote
-Dcom.sun.management.jmxremote.port=3000
-Dcom.sun.management.jmxremote.ssl=false
-Dcom.sun.management.jmxremote.authenticate=false"

# both MRv1 (0.22 and earlier, 1.0, 1.1) and YARN (0.23, 2.*)
export HADOOP_SECONDARYNAMENODE_OPTS="$HADOOP_SECONDARYNAMENODE_OPTS -Dcom.sun.management.jmxremote
-Dcom.sun.management.jmxremote.port=3001
-Dcom.sun.management.jmxremote.ssl=false
-Dcom.sun.management.jmxremote.authenticate=false"

# both MRv1 (0.22 and earlier, 1.0, 1.1) and YARN (0.23, 2.*)
export HADOOP_DATANODE_OPTS="$HADOOP_DATANODE_OPTS -Dcom.sun.management.jmxremote
-Dcom.sun.management.jmxremote.port=3002
-Dcom.sun.management.jmxremote.ssl=false
-Dcom.sun.management.jmxremote.authenticate=false"

# only MRv1 (0.22 and earlier, 1.0, 1.1)
export HADOOP_TASKTRACKER_OPTS="$HADOOP_TASKTRACKER_OPTS -Dcom.sun.management.jmxremote
-Dcom.sun.management.jmxremote.port=3003
-Dcom.sun.management.jmxremote.ssl=false
-Dcom.sun.management.jmxremote.authenticate=false"

# only MRv1 (0.22 and earlier, 1.0, 1.1)
export HADOOP_JOBTRACKER_OPTS="$HADOOP_JOBTRACKER_OPTS -Dcom.sun.management.jmxremote
-Dcom.sun.management.jmxremote.port=3004
-Dcom.sun.management.jmxremote.ssl=false
-Dcom.sun.management.jmxremote.authenticate=false"

# only YARN (0.23, 2.*)
export YARN_RESOURCEMANAGER_OPTS="$YARN_RESOURCEMANAGER_OPTS -Dcom.sun.management.jmxremote
-Dcom.sun.management.jmxremote.port=3005
-Dcom.sun.management.jmxremote.ssl=false
-Dcom.sun.management.jmxremote.authenticate=false"

# only YARN (0.23, 2.*)
export YARN_NODEMANAGER_OPTS="$YARN_NODEMANAGER_OPTS -Dcom.sun.management.jmxremote
-Dcom.sun.management.jmxremote.port=3006
-Dcom.sun.management.jmxremote.ssl=false
-Dcom.sun.management.jmxremote.authenticate=false"

# only YARN (0.23, 2.*)
export HADOOP_JOB_HISTORYSERVER_OPTS="$HADOOP_JOB_HISTORYSERVER_OPTS -Dcom.sun.management.jmxremote
-Dcom.sun.management.jmxremote.port=3007
-Dcom.sun.management.jmxremote.ssl=false
-Dcom.sun.management.jmxremote.authenticate=false"

# only YARN (0.23, 2.*)
export YARN_PROXYSERVER_OPTS="$YARN_PROXYSERVER_OPTS -Dcom.sun.management.jmxremote
-Dcom.sun.management.jmxremote.port=3008
-Dcom.sun.management.jmxremote.ssl=false
-Dcom.sun.management.jmxremote.authenticate=false" |
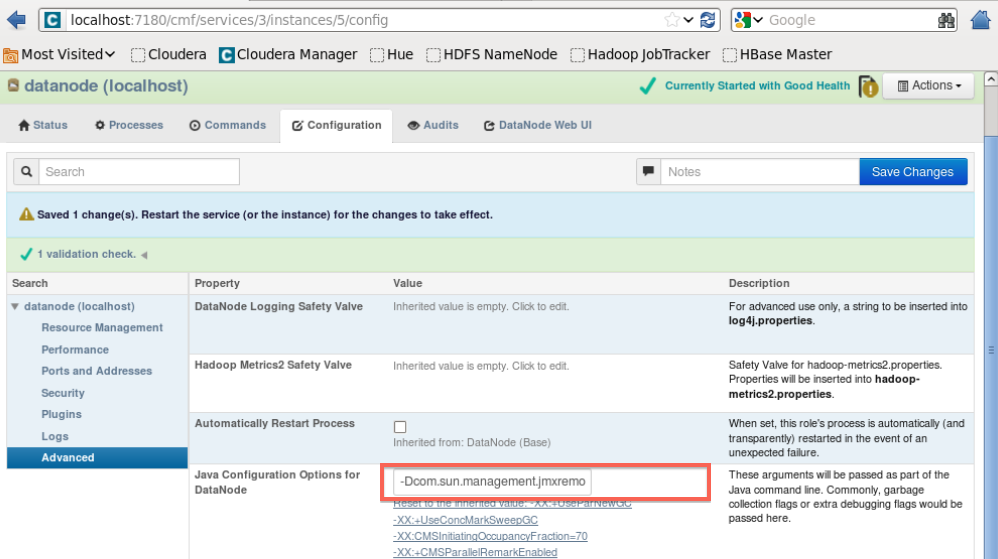
If you are using CDH GUI to administer your Hadoop setup, you can adjust "Java Configuration Options" for each Hadoop node through the console. For instance, for DataNode, you would go to Services ==> hdfs ==> DataNode (link in status column) ==> Configuration. Expanding options shown for datanode under Search column (click on arrow) shows Advanced. Under Advanced, Value for "Java Configuration Options for DataNode" should be with same values added to HADOOP_DATANODE_OPTS variable in the example above.
...
Below is the image of CDH UI:
ZooKeeper
Adjust your zkServer.sh (usually found at /usr/lib/zookeeper/bin/zkServer.sh) by changing JVMFLAGS as follows:
| Code Block | ||
|---|---|---|
| ||
export JVMFLAGS="$JVMFLAGS -Dcom.sun.management.jmxremote
-Dcom.sun.management.jmxremote.port=3000
-Dcom.sun.management.jmxremote.ssl=false
-Dcom.sun.management.jmxremote.authenticate=false" |
Kafka
Kafka Broker has no port opened for JMX by default. To fix this edit kafka-server-start.sh by changing JMX_PORT as follows:
| Code Block | ||
|---|---|---|
| ||
export JMX_PORT=9999 |
Or start Kafka Broker like:
| Code Block | ||
|---|---|---|
| ||
$ env JMX_PORT=9999 bin/kafka-server-start.sh config/server.properties |
For enabling JMX on Producer and Consumer nodes do it like you would do it for a simple JVM application.
Storm
Storm lets you specify Nimbus, Supervisor, and Workers' JMX ports by editing the storm.yaml file:
For Nimbus (in this example we specify JMX port as 3000):
| Code Block | ||
|---|---|---|
| ||
nimbus.childopts: "-Dcom.sun.management.jmxremote -Dcom.sun.management.jmxremote.port=3000 -Dcom.sun.management.jmxremote.ssl=false -Dcom.sun.management.jmxremote.authenticate=false" |
For Supervisor (in this example we specify JMX port as 4000):
| Code Block | ||
|---|---|---|
| ||
supervisor.childopts: "-Dcom.sun.management.jmxremote -Dcom.sun.management.jmxremote.port=4000 -Dcom.sun.management.jmxremote.ssl=false -Dcom.sun.management.jmxremote.authenticate=false" |
For Workers (use this approach to have Storm dynamically assign a JMX port to each Worker choosing from the port range specified in the storm.yaml):
| Code Block | ||
|---|---|---|
| ||
worker.childopts: "-Dcom.sun.management.jmxremote -Dcom.sun.management.jmxremote.ssl=false -Dcom.sun.management.jmxremote.authenticate=false -Dcom.sun.management.jmxremote.port=%ID%" |
For the above to work make sure the JMX port range is defined in storm.yml as follows:
| Code Block |
|---|
supervisor.slots.ports:
    - 6700
    - 6701
    - 6702
- 6703 |
Additional Notes
...
| Code Block | ||
|---|---|---|
| ||
-Djava.rmi.server.hostname=localhost |
If you are having issues connecting SPM standalone monitor to your server, you may want to add the said option to your server/java process and restart it. After that, also restart SPM monitor:
...
| language | bash |
|---|
...
Documentation moved to http://sematext.com/docs/monitoring/spm-monitor-standalone/